[ad_1]
Indian Bank Net Banking Registration, New user Forgot Activation, Login, Reset Password, Add Recipient, Set Up Transaction password Online via https://www.indianbank.net.in/jsp/startIBPreview.jsp
Indian Bank Net Banking
Bank of India is a financial and banking services company owned by the Government of India. The bank was established in 1907 with headquarters in Chennai, India. Bank of India serves millions of customers every day and provides various banking services to all. The bank has evolved over the years and implemented new banking services to suit the modern world. Customers can enjoy online banking services from the comfort of their homes. The bank has net banking services as an online platform for checking bank, transfers and statements online.
Registration Process for Indian Bank Net Banking
To perform net banking on your device, one has to register and fill some banking details. After the registration process, the customer can use the following services.
Indian Bank Net Banking Login Registration 2023
New user registration
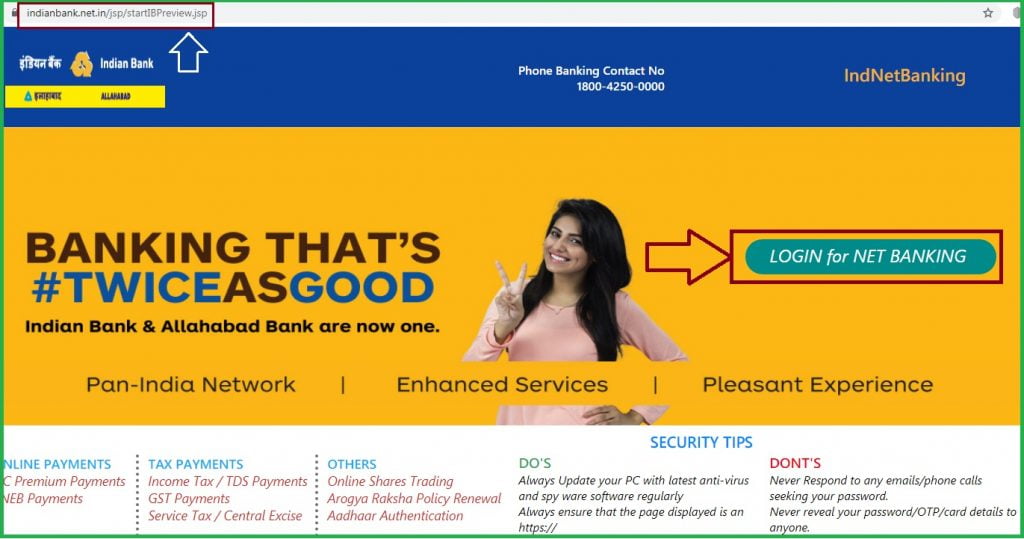
- Go to Bank of India website portal by visiting this link – https://www.indianbank.net.in/jsp/startIB.jsp
- Select “Login for Net Banking” on the right side of the page
- Select the “New User” option online.
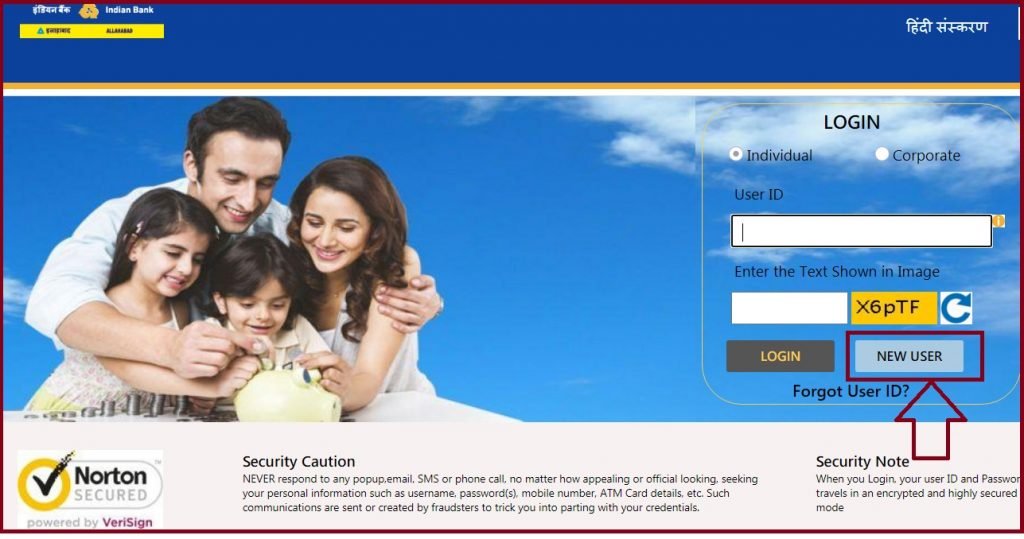
- Next, enter your account number and registered mobile number. Note that the Indian code is 91, which should be the prefix of the phone number. Check the details again, then click the submit button.
- The portal will send an OTP number to the registered mobile number. Enter the OTP for verification.
- Now enter account details, date of birth and registered email id.
- Proceed to select the feature type, such as view-only rights, transactions, etc.
- Customer has to create password for net banking account.
- The page will show secret questions, choose two and answer, which you will remember for reference.
- Now select activation type through ATM Card or Indian Bank Branches.
- If one opts through Indian bank branches, he/she has to download the activation form from the portal and then submit it at the nearest branch.
- For ATM card processing, key in all the card details and agree to the terms and conditions.
- The bank will confirm and validate the information, then send a success message on the screen. Note that the account will be activated within 24 hours. You can exit by setting your transaction password.
- The process is complete, and you can log in to the net banking portal using your user id and password.
How to Set Indian Bank Net Banking Transaction Password
Indian Bank Net Banking Transaction Password Activation
Net banking platform requires transaction password for banking activities. Below are few steps to follow:
- Visit the official website of Indian Bank.
- On the homepage, select the tab Personal banking option.
- Enter your account number as user ID and login password, which was set during registration.
- The portal will request you to set a transaction password.
- Please enter the password and make sure it is the password you want.
- Now click on the Exit tab. You can log in to the net banking page for transaction activities.
How to Add New Beneficiary in Indian Bank Net Banking
Adding Beneficiary to Indian Bank Net Banking Service (Add Payee)
Net banking services allow users to send money to different people or accounts. One has to add the payee as beneficiary (payee) using the steps given below.
- Go to the official Indian Bank net banking portal.
- Enter your user ID and password to login to the homepage.
- On the menu, select the tab Fund Transfer below Accounts tab.
- Click Next Add Beneficiary tab
- Continue and “Add payee from same bank (Indian Bank) or add payee from other bank as per requirement.
- Now provide the beneficiary’s account number, account name and IFSC code. Make sure the details are correct before adding.
- System will send OTP to your registered mobile number. Enter the number for confirmation by clicking on New for confirmation.
- A new message will appear on the screen indicating successful addition of beneficiary.
Fund transfer using Indian Bank Net Banking
After adding the beneficiary, the user can transfer any amount to other accounts using NEFT, RTGS or IMPS.
Transfer using IMPS
- On Net Banking, select the option Fund Transfer tab on the portal menu.
- User should select the best mode of transfer to proceed.
- Now select the beneficiary account to transfer and enter all the details about the account like account name, IFSC code and amount to be transferred.
- Enter your transaction password then click on the confirm button.
- System will send OTP to registered mobile number, enter the number for verification.
Opening Indian Bank Savings Account Online
- Visit the Indian Bank Online Saving Account website portal.
- Fill the savings account form properly and provide all the documents required by the bank.
- After filling the form recheck and submit the information, the bank will process and verify all the details before opening the savings account.
- User can check the account status through the official; Website using application no.
- If the form is not filled then the system saves all the details; The user can later continue from where they left off.
Indian Bank Net Banking Password Reset Online
- Go to the official Indian Bank Net Banking website portal by clicking on the link https://www.indianbank.net.in/jsp/IBSForgotUserID.jsp
- Enter your User ID and Captcha code shown on the page and then select the Login button.
- On the homepage, click on the option of Forgot password.
- The page will ask you to select the mode of reset, either ATM card or secret question.
- Your user ID, phone number and security code are provided on the page for the ATM option key. A new page will appear with CIF number and mobile number.
- The system will send an OTP to your registered mobile number, enter it in the space provided and click on submit button.
- Please enter a new password and re-enter it for confirmation then select the Confirm button.
- The page will send an acknowledgment message about the new changes.